Precautions for use of portable biochemistry analyzer samples and reagents

release time:2021-11-08 15:51:12

1. Biochemical analyzer sample use precautions

Here we use the Seamaty fully automated dry biochemistry analyzer SD1 as an example. When handling blood samples and operating the analyzer, users should strictly adhere to the general and medical institution-specific laboratory biosafety regulations.
seamaty reagent tray
  1. 1) Add a sample volume of 100 μl to the reagent tray, with a permissible sample range of 90-120 μl (it is recommended that a blood volume of at least 250 μl be collected for review).
  2. 2) The use of lithium heparin anticoagulation tubes is recommended for sample processing.
  3. 3) Blood samples should be transferred into anticoagulation tubes as soon as possible after collection and inverted up and down 3-5 times to ensure that the sample and anticoagulant are well mixed.
  4. 4) Whole blood must be analyzed or converted to plasma and blood within 30 minutes of collection. If the test is performed after the sample has been out of the body for a longer period of time, the accuracy of the test results may be affected.
  5. 5) Do not freeze or shake whole blood samples vigorously in the refrigerator to prevent hemolysis.
  6. 6) If the test cannot be performed in a timely manner, plasma and serum should be separated and stored in a sealed place at 2-8°C away from light. Other than that, it should be tested within 24 hours. Store on ice at -20°C for a maximum of 30 days and do not freeze and thaw repeatedly. If these restrictions are not met, analyte concentrations may be altered and the assay results will have no real clinical significance.
  7. 7) In order to obtain correct glucose results, blood should be collected at least 12 hours after the subject has fasted.
  8. 8) Anticoagulated whole blood without clots, or plasma or serum without hemolysis. The automatic dry biochemistry analyzer has a built-in centrifugation function. It can automatically separate the anticoagulated whole blood from the plasma for testing. Anticoagulated samples should use lithium heparin anticoagulant which has less effect on biochemical tests.
  9. 9) Sample collection must be performed by professional personnel. Operators should wear protective gloves, masks and overalls to avoid contaminating the sample.
  10. 10) When the sample cannot meet the test requirements, or has been contaminated samples should be disposed of in a timely manner in accordance with local regulations. Use special packaging and containers for medical waste, and there should be obvious warning signs and warning instructions.

2. Precautions for the use of reagent trays of biochemistry analyzer (Take the reagent trays of SD1 as an example)

SD1 automatic dry biochemical analyzer and its supporting test reagent tray diameter is about 8CM, about 2CM thick. the center of the reagent tray is equipped with a plastic cup containing diluent. The reagent tray is equipped with a plastic cup in the center to hold the diluent, and the colorimetric holes on the edge of the tray contain lyophilized reagents for different biochemical items. The reagent tray is a single-use, single-serving package. The reagent tray is designed with independent internal channels for disposable use to avoid cross-contamination. The reagent trays can be combined in various combinations, which can be easily chosen by users, and customization service is also available.

(1) Reagent tray storage and handling

  1. 1) Follow the instructions on the reagent tray label to store the reagent trays. This will ensure the expiration date of the reagent discs.
  2. 2) Store reagent trays at 2-8 ℃. After taking them out of the refrigerator or cold storage box, they need to recover at room temperature for 20 minutes before unpacking.
  3. 3) Sealed reagent tray bags can be stored at room temperature below 25°C for 48 hours. Do not leave for longer periods to avoid reagent tray failure.
  4. 4) Do not expose reagent discs to the sun or to temperatures exceeding 32°C.
  5. 5) Remove the reagent tray by tearing the aluminum film bag and inspect the tray for damage. Do not use damaged reagent trays.
  6. 6) Keep the reagent tray clean. Take the edge of the reagent tray to prevent the optical surface from being contaminated.
  7. 7) If you need to mark the reagent tray manually, you can mark it with a marker on the gray area inside the white ring band of the reagent tray.
  8. 8) After adding the sample, it should be tested on the machine immediately. Avoid excessive tilting and deliberate shaking of the reagent tray after sample addition before testing on the machine.
  9. 9) Reagent trays are for single use. Reagent trays should be disposed of promptly after use. Use special packaging and containers for medical waste, and there should be obvious warning signs and warning instructions.
  10. 10) When reagent trays need to be removed, pay attention to protection and be careful of damaging the QR code. Operators must take protective measures, wear protective gloves, masks, etc.
  11. 11) When the reagent tray is damaged or broken, once the skin comes into direct contact with the reagent, please clean and disinfect the contact area immediately. Also consult a doctor.

Note: The reagent should be used within 10 minutes after opening. This will prevent condensation and ensure that the test temperature reaches the required level. Reagent trays that have been opened and not used should not be returned to the refrigerator.

(2) Sample addition
Add samples to the reagent tray

  1. 1) Use a 100μl standard pipette and a disposable tip to inject the sample at an angle of 45 into the only conical sample hole on the reagent tray.
  2. 2) The amount of sample to be added should not be too much or too little. It should be close to, but not more than, the straight line indicated by the triangle on the reagent tray. Too little sample will affect the test results. Too much sample will overflow the sample chamber. The recommended range is 90-120 μl. 
  3. 3) To avoid cross-contamination, the same tip should not be used repeatedly to aspirate multiple samples.
  4. 4) Hold the edge of the reagent tray horizontally and place the prepared tray into the machine.

Note
  1. 1) Do not contaminate or damage the barcode in the center of the reagent tray.
  2. 2) Do not touch the pointed part of the pipette tip as this may affect the accuracy of the test for certain items. 
  3. 3) When aspirating samples, it is appropriate to immerse the pipette tip 2-3 mm below the sample level.
  4. 4) Do not aspirate the sample into the reagent tray for refilling.
  5. 5) If there is any residual liquid on the surface of the reagent tray, especially around the sample filling hole, wipe it off with a clean, dust-free paper towel or cloth. In addition, the used paper towels or cloths should be placed in the biological waste bin. When wiping residual liquid from the surface of the reagent tray, please take care not to aspirate the sample from the sample chamber. 
  6. 6) Put the disposable tip into the bio-waste bin after the sample is added.
Prev Return Next

Related Reading

Handheld Blood Gas Analyzers Comparison: Abbott i-STAT vs. Siemens EPOC vs. Seamaty SG1

2023-12-20

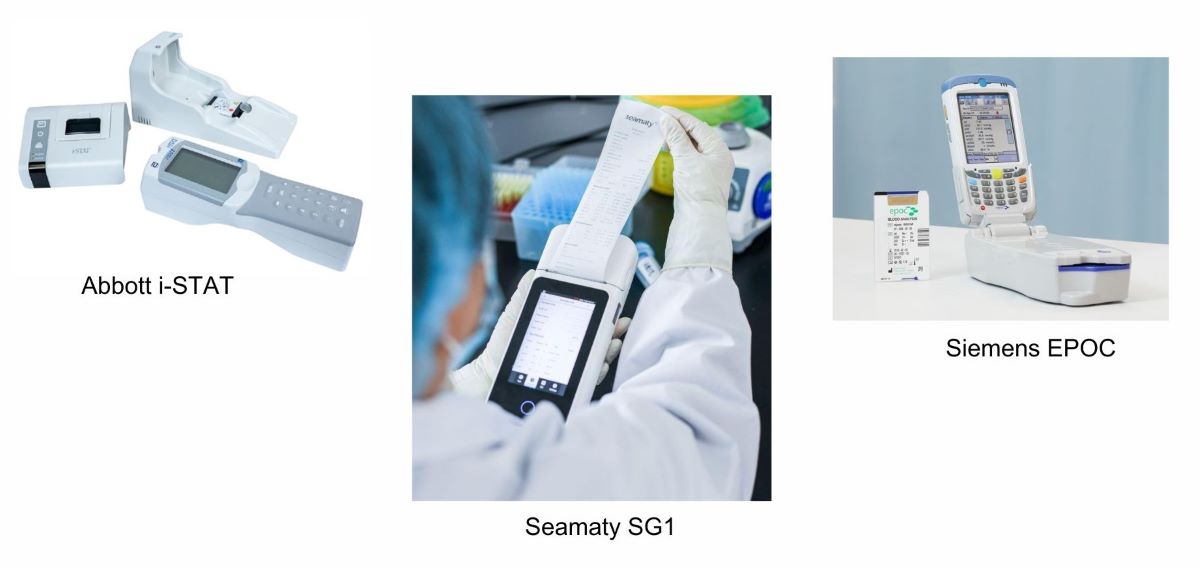
Handheld Blood Gas Analyzers Comparison: Abbott i-STAT, Siemens EPOC, Seamaty SG1 - which one suits you better? This article provides a detailed comparison of these three products, including key indicators such as measurement principles, speed, parameters, samples, and more, helping you choose the most suitable medical device.

How to Choose the Perfect Electrolyte Analyzer for Your Small to Mid-Sized Clinics?

2023-08-23

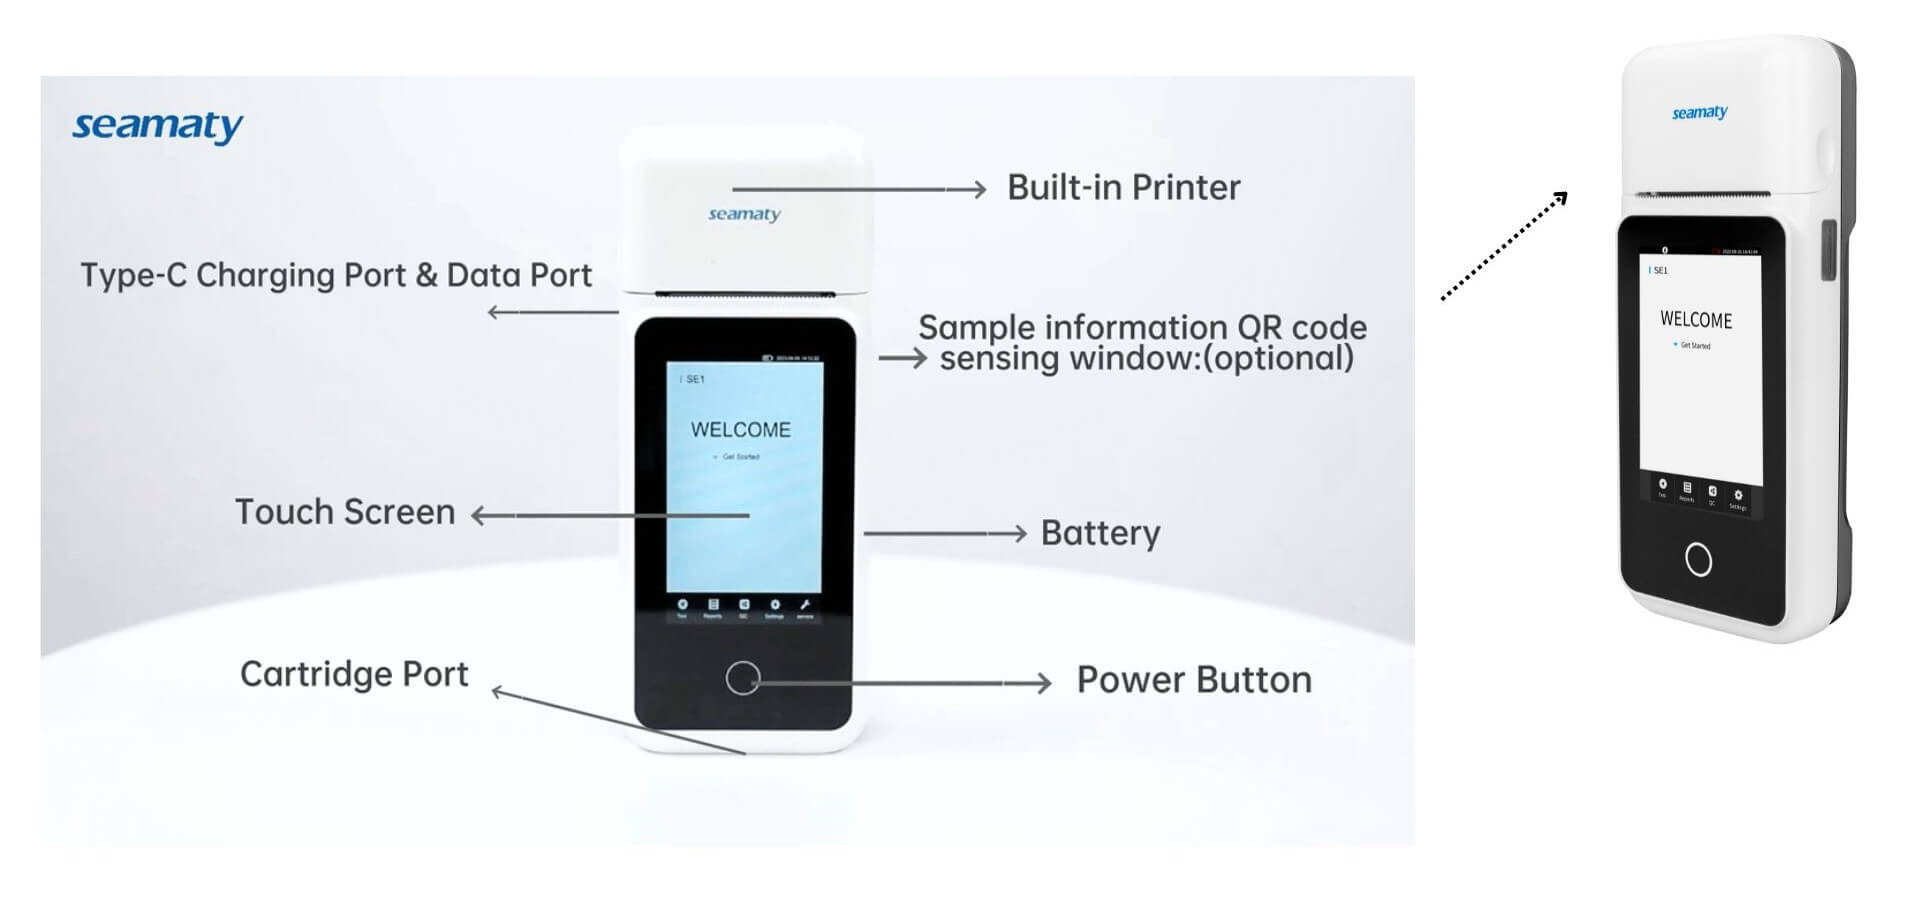
Discover how to pick the perfect electrolyte analyzer for small to mid-sized clinics. Learn about different types, benefits, and Seamaty's SE1 electrolyte analyzer, enhancing patient care with its portable precision.

Poct Disadvantages: Training, Reporting, Regulations

2021-09-14

Last time we introduced the 6 disadvantages of POCT test and the solutions. Now let's understand the remaining 3 disadvantages together.